How I Taught Claude FlutterFlow
The tutorial companion to "I Taught Claude What It Didn't Know"

If you’re trying to use Claude for step-by-step build instructions on FlutterFlow, you’re likely running into frustration with incorrect commands. Between Claude’s training cutoff and FlutterFlow’s current version, absent changes to how Claude behaves, there’ll always be a knowledge gap. This article is a tutorial on how you can reduce this gap via a changelog file creation and custom project instructions.
The backstory is here:
The Problem
If you're a no-coder like me, trying to use Claude to learn how to develop apps on FlutterFlow, you're likely frustrated. Because Claude is giving you instructions that are impossible to follow. Menus that do not exist, wrong architecture, workarounds for problems FlutterFlow already solved.
Prompt for Claude (issued on Opus 4.7 on 4/18/26):
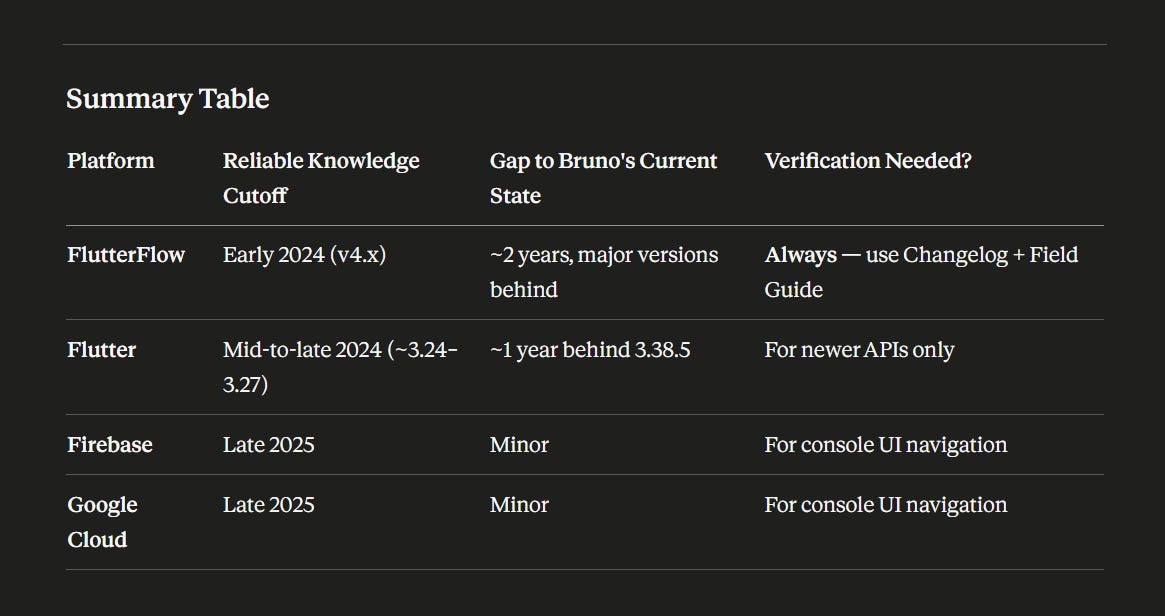
Provide Platform knowledge cut-off date for FlutterFlow, Flutter Version, Firebase and Google Cloud
The Fix
In order to get better accuracy (and even better app development architecture) you'll need to prove to Claude that its FlutterFlow knowledge is out of date, and you'll need to add project instructions that compensate.
The short version: telling Claude "your FlutterFlow knowledge is outdated" doesn't work, because it adjusts tone but still pulls every specific instruction from the same stale training data. A changelog works because it replaces "something is wrong" with a specific list of what changed. I asked Claude to explain why, and the full explanation is at the end of this article (see appendix).
What About FlutterFlow Designer?
In February 2026, FlutterFlow launched FF Designer — an AI tool that generates screens from a text prompt and exports them directly into FlutterFlow. Check it out for yourself at designer.flutterflow.io. FlutterFlow’s own description says it best: “Generate quality designs in seconds. Iterate on a canvas with AI. Maintain full design control.” The key word is designs. FlutterFlow is calling it a design tool, not a build tool.
If you already know what your app should do, how it should navigate, what data it needs, and you just need screens built fast, Designer might be exactly what you need and this tutorial may not be for you.
This tutorial is for the people using Claude to figure out what to build, not just how it looks. I don’t know code, and when I started I didn’t know FlutterFlow. I had zero idea of what to ask. It’s through Claude that I’m architecting the idea, the flow, the customer experience, the security rules. A screen generator builds what you tell it to build. But if you don’t know what to tell it, you get screens with no foundation under them.
GitHub Links
The scripts used in this tutorial are on the main branch of my repository:
If you’d rather skip the tutorial and just need the exported files, they’re available on the export branch:
A Note on FlutterFlow’s Changelog Location
On March 26, FlutterFlow made an announcement that new changes would be published at this URL: https://www.flutterflow.io/flutterflow-changelog. This tutorial relied on the changes being listed on the community pages at https://community.flutterflow.io/c/whats-new-in-flutterflow
This tutorial is still relevant for two reasons. At least so far, the historical changes were not migrated to the new page. And, the community page shows new product updates dating past March 26. If in fact product updates stop being published in the community page, this method may need to be revised.
Step 1: Create a Working Directory
This tutorial requires a Windows 11 with Google Chrome environment. We’ll start creating the working folder to extract the data we need.
Familiar with Windows? Create a folder called "ff-whatsnew-md" at the root of your C drive and skip to Step 2.
Create a working directory
Click windows key
Search for File Explorer

c. Open File Explorer
d. Expand “This PC” (1)
e. Expand “Windows (C:)” (2)
f. On the top right, click New—> Folder (3)
g. Right click the folder called “new folder”, and select rename (4)
h. Rename folder to “ff-whatsnew-md”
\" drive expanded below it. Step 3: The \"New\" button in the top toolbar. Step 4: A newly created folder at the bottom with a right-click context menu showing Rename selected. Folder names and some contents are redacted.")
Working Directory Creation Complete
Step 2: Download Scripts
You’ll now need the scripts that will extract the FlutterFlow what's new information from FlutterFlow community pages, and convert them to a format called .MD.
Access my GitHub page at:
closing-claudes-knowledge-gap
With the page open, click the green button labeled Code
Select Download Zip

Download Scripts Complete
Step 3: Extract Files to Working Directory
Next you’ll extract the compressed files into the working folder directory you created on step 1.
Familiar with compressed files? Extract the zip file to C:\ff-whatsnew-md. The extraction creates a subfolder — copy its contents up to the main directory and skip to Step 4.
Navigate to your downloads folder (or the folder you selected to download the compressed file)
Right click the file closing-claudes-knowledge-gap-main.zip
from the dropdown select EXTRACT ALL

From the Extract Compressed Folders pop-up, click Browse
 Folders\" dialog showing the default extraction path set to the Downloads folder. A red-numbered annotation labeled 4 highlights the \"Browse…\" button used to change the destination directory. The username in the file path is redacted with a blue box for privacy.")
From the Windows Explorer Window, expand “this PC” (you may need to scroll down the side window on the left to see it)
Immediately under, click on “Windows (C:)
On the right you’ll see several folders, click ff-whatsnew-md
Click Select Folder
\" beneath it, 7 highlights the selected folder \"ff-whatsnew-md\" in the file list, and 8 points to the \"Select Folder\" button at the bottom right. Other folder names are redacted with blue boxes for privacy.")
You’re now back at the Extract Compressed Folders tools. Leave “show extracted files when complete” checked, and click EXTRACT
 Folders\" dialog with three red-outlined annotations: the destination path field showing \"C:\ff-whatsnew-md,\" the checked \"Show extracted files when complete\" checkbox, and the number 9 highlighting the \"Extract\" button at the bottom right.")
The folder ff-whatsnew-md will open, along with a closing-claudes-knowledge-gap-main subfolder. You’ll need to move the contents to the main folder.
double click closing-claudes-knowledge-gap-main to open the folder

select all EXCEPT .gitignore
Right Click the selection and select the copy option

Browse back to ff-whatsnew-md folder
Right click in the empty area of the directory (do not select the closing-claudes-knowledge-gap-main folder), followed by paste

You should now see the files listed in your main ff-whatsnew-md folder. If you’re not seeing the extensions (.bat, ,py, .md, etc) that is just a view setting and it’s ok. As long as you see the 4 files, it’ll work

Extract Files to Working Directory Complete
Step 4: Python Installation
Familiar with Python and already have it installed? We're using Python 3.12. Ensure "Add python.exe to PATH" was checked during installation. Create and activate a virtual environment (python -m venv venv, then venv\Scripts\activate), and install dependencies with pip install requests python-dateutil markdownify. Skip to Step 7.
Software Installation
Select the Windows operating system option

Select version 3.12. Ensure to select the Download option for version version 3.12

After installer downloads, open the file to start the installation. Select Install now (default installation)
IMPORTANT: Ensure the check box “Add python.exe to PATH” is checked

Python Installation Complete
Step 5: Verify Python Installation
You’ll now need to verify that Python properly installed on your system.
a. Press Windows Key
b. Type CMD
c. Press ENTER (or click Command Prompt)

d. You’ll see the command prompt window with a blinking cursor
e. Type:
python --version

python --version and press Enter. If the installation was successful, you’ll see the version number confirmedIf your installation was successful, you should see as above: Python 3.12.10
Python Verification Complete
Step 6: Prepare Python Virtual Environment and Install Dependencies
If you’re a non-coder like me and new to Python, the next steps may be a bit intimidating. This is not impacting your computer in any way. They’re just python dependencies and if you decide to uninstall Python, they’ll be removed from your computer as well.
Open a command prompt (the same way as in step 5)
Windows Key
Type CMD
Press Enter (or click command prompt)

Search for “cmd” in the Windows search bar and open Command Prompt
You’ll now need to change directories within the command prompt so you’re inside your working folder (completed on step 1)
With the cursor blinking, type:
cd C:\ff-whatsnew-md
Press Enter. Your window should now match the image below

Type cd C:\ff-whatsnew-md(2) to navigate to the working directory. The prompt should update to confirm you're in C:\ff-whatsnew-md
You’ll now need to create a virtual environment. Type and press ENTER:
python -m venv venv
Note: This command will create a VENV directory in your ff-whatsnew-md folder. That is expected behavior, DO NOT DELETE that folder.
After a few seconds, you’ll see the cursor blinking again. Then Type and press ENTER:
venv\Scripts\activate
Your command prompt will now be appended by (venv) like the picture below
\" in a red outline, confirming the virtual environment is active. The username is redacted with a blue box for privacy.")
Create a virtual environment with python -m venv venv(3), then activate it withvenv\Scripts\activate(4). The (venv) prefix confirms the environment is activeContinue in Same Window - Install Dependencies
Now you’ll install dependencies needed by Python. We need pip and markdownify.
PIP: From the line with (venv), type the line below and press ENTER:
python -m pip install --upgrade pip
The installation is automatic. Your screen may be slightly different if this is the first time installing this dependency on your machine. What matters is that you see a “successfully installed” line

Run python -m pip install --upgrade pip(5) to upgrade pip. The process completes automatically, and you should see a "Successfully installed" confirmation at the bottom
markdownify: from the last line after successfully installed (for pip) with venv, type:
pip install requests python-dateutil markdownify

Run pip install requests python-dateutil markdownify(6) to install the required packages. The process completes when you see the "Successfully installed" line listing all dependenciesAs before, the installation is automatic. When you see Successfully Installed, the process is completed
To avoid confusion in the next steps, and since this installation should only be done once, CLOSE THE COMMAND PROMPT

\" in a red outline, confirming the virtual environment is active. The username is redacted with a blue box for privacy.")


Python Environment Setup and One Time Dependencies Installation Complete
Step 7: Install Cookies Exporter - Chrome
If you open your browser and go to the FlutterFlow community page, you’ll be able to access content without any issues. However, the script we will be using doesn’t load the webpage as you’re seeing it. It’s calling an underlying API, and that API still requires authentication. The way we’ll address it, is via a browser cookie exporter.
Already have a cookies exporter installed and know how to export them? Skip to Step 8.
Access the Chrome Web Store at:
You’ll need to install a cookies exporter. The one I utilized was:

Click Add extension to install. Note the permissions it requests — review them carefully before proceeding. NOTE: I'm not affiliated with this developer. Cookie files may contain sensitive session data — use your own judgment when choosing an exporter. Once you've exported your cookies, consider uninstalling the extension to minimize your exposure.
Let’s pin the extension, so it’ll be visible when accessing the FlutterFlow community page
Click the Extensions icon (puzzle piece) in the top-right of Chrome
Find “Get cookies.txt LOCALLY” in the list
Click the pin icon next to it
The extension will now appear permanently in your toolbar

 highlights the puzzle-piece Extensions icon in the top-right corner of the browser toolbar, and 3(b) highlights the pin icon next to \"Get cookies.txt LOCALLY.\" Once pinned, the icon will remain fixed in the toolbar like the other pinned extensions shown below it. Other extension names and icons are redacted with blue boxes for privacy.")
Cookies Exporter Installation Complete
Step 8: Open Virtual Environment
We are now ready to run the scripts and export the data by topic from FlutterFlow to .md pages. Each individual topic will be a separate file, that is the expected behavior at this point.
Familiar with Python? If your command prompt from Step 4 is still open with an active venv, skip to Step 9. If not, open a new command prompt, run cd C:\ff-whatsnew-md and venv\Scripts\activate, then skip to Step 9.
Open the command prompt
Change the directory to our working folder by typing and pressing enter:
cd C:\ff-whatsnew-md
Activate the Virtual Environment you created on Step 6. Type the following and press enter:
venv\Scripts\activate
Your screen should match the one below:
\" confirming the virtual environment is active. The username is redacted with a blue box for privacy.")
Navigate to the working directory with cd C:\ff-whatsnew-md(2), then activate the virtual environment withvenv\Scripts\activate(3). The (venv) prefix confirms you're ready to go.
\" confirming the virtual environment is active. The username is redacted with a blue box for privacy.")
Since we closed the command prompt after the dependency installation, it’s why we reactivated the virtual environment in this step.
Virtual Environment ready - Leave this Window Open
Step 9: Export Cookies
We’ll need to export the cookies file. Since they expire periodically, it’s important that you follow this process at a reasonable speed. If the script fails, most likely your cookies expired and you’ll need to download them again.
Familiar with Cookies exports? Go to https://community.flutterflow.io/ login, and export the cookies. Name the file cookies.txt and save it in C:/ff-whatsnew-md. Skip to step 10.
From Google Chrome, open the FlutterFlow community page
Click Log in

Navigate to community.flutterflow.io (1) and click Log in (2) to sign in to your FlutterFlow Community account When you log in, you may be taken to your project page. Click on community on the left menu to return to the community page
Once you are at the community page logged in, at the upper right corner, click the Cookies extension exporter icon (installed on step 7)

Click the Get cookies.txt extension icon (4) in your browser toolbar Click the “Export As” button

Confirm the URL shows community.flutterflow.io, then click Export As (5) to save the cookies file to your working directory From Windows Explorer Save As window, browse to your C:\ff-whatsnew-md directory
Change the name of the file, so it’s saved as cookies.txt
Click SAVE
,\" annotation 6 marking the address bar showing \"This PC > Windows (C:) > ff-whatsnew-md,\" annotation 7 highlighting the file name field containing \"cookies.txt,\" and annotation 8 marking the \"Save\" button at the bottom right. The folder contents show the closing-claudes-knowledge-gap-main and venv subfolders. A folder name is redacted with a blue box for privacy.")
In the Save As dialog, navigate to C:\ff-whatsnew-md (6), name the file cookies.txt (7), and click Save (8) Browse to your working directory via file explorer, and confirm you see the file cookies.txt


,\" annotation 6 marking the address bar showing \"This PC > Windows (C:) > ff-whatsnew-md,\" annotation 7 highlighting the file name field containing \"cookies.txt,\" and annotation 8 marking the \"Save\" button at the bottom right. The folder contents show the closing-claudes-knowledge-gap-main and venv subfolders. A folder name is redacted with a blue box for privacy.")

Cookies Export Completed
Step 10: Export Script - What’s New Files
Return to your Command Prompt, opened on step 8
At the (venv) c:\ff-whatsnew-md line type the command below and press ENTER:
python export_whatsnew.py
 back to January 2024. At the bottom, a red outline highlights the completion message: \"Reached posts older than Jan 1, 2024. Stopping. Done. Exported 48, skipped 0, 0 needs_manual stubs.\"")
Run python export_whatsnew.py(2) to begin exporting. The script processes each post and stops when it reaches posts older than January 1, 2024, confirming with "Exported 48, skipped 0."If the script failed, the first thing to try is to go back to the chrome browser. Log off FlutterFlow. Log in again and try the cookies export again.
 back to January 2024. At the bottom, a red outline highlights the completion message: \"Reached posts older than Jan 1, 2024. Stopping. Done. Exported 48, skipped 0, 0 needs_manual stubs.\"")
What’s New Files Export Completed
Step 11: Merge All Files into a Single Zip File
The export generated 48 separate files. Before we bring them to Claude, we need to combine them into a single zip file. I'll explain why in the next step.
Familiar with file compression? Copy
index.mdfromC:\ff-whatsnew-mdinto thetopicssubfolder. Select all files insidetopics(includingindex.md) and compress to a single .zip file. Skip to Step 12.
From Windows Explorer, access your C:\ff-whatsnew-md working folder
Right Click the index.md file
Select COPY
After Selecting COPY, open the TOPICS folder

In the ff-whatsnew-md directory (1), right-click index.md (2) and click Copy (3). Then open the topics folder (4). Right-click on an empty area inside the topics folder and select Paste — this adds the index alongside the exported markdown files

Inside the topics folder (4), right-click in an empty area and click Paste (5) to add the index.md file alongside the exported markdown files. Select all files: press Ctrl+A, or (a) click the three-dot menu in the toolbar and select (b) Select All
 marks the three-dot overflow menu in the toolbar, and 6(b) highlights the \"Select all\" option in the dropdown menu. All markdown files in the folder are checked, indicating they are being selected. The dropdown also shows other options like Undo, Compress to ZIP file, Select none, and Invert selection.")
Click the three-dot menu (6a) in the toolbar and select Select all (6b) to highlight every file in the topics folder Right-click any of the selected files, hover over Compress to…, and select ZIP File
 highlighting the \"Compress to…\" option and 7(b) marking \"ZIP File\" in the submenu. Other compression options like 7z File, TAR File, and Additional options are also visible.")
Right-click the selected files, hover over Compress to… (7a), and select ZIP File (7b). The zip file appears at the bottom of the directory. The default name is fine — rename it with the export date if you prefer

The ZIP file is created in the same folder (8). The default name is fine — rename it if you prefer What’s New File Merge Completed


 marks the three-dot overflow menu in the toolbar, and 6(b) highlights the \"Select all\" option in the dropdown menu. All markdown files in the folder are checked, indicating they are being selected. The dropdown also shows other options like Undo, Compress to ZIP file, Select none, and Invert selection.")
 highlighting the \"Compress to…\" option and 7(b) marking \"ZIP File\" in the submenu. Other compression options like 7z File, TAR File, and Additional options are also visible.")

Step 12: Claude Setup - Files
Claude.ai only allows 20 file uploads per conversation and since we have 48 individual files the way around it is with a single zip file upload. Once it’s in the conversation, Claude unzips it with a bash command and reads every file inside, in order, missing nothing.
Familiar with Claude? Use a current project or if you don't have a project set up, create one. Open a new conversation, attach the zip file (do not upload to project files), and paste the prompt from Step 12, Item 3. Then continue from Step 13.
You might be wondering: why not just upload the 48 files to Project Knowledge and skip the conversation entirely? Because Project Knowledge uses semantic search — it returns fragments that match your query, not whole files. That’s great when you’re looking for one specific answer. It’s terrible when Claude needs to read everything systematically. Fragments from 48 different release notes, returned out of order based on keyword relevance, with no guarantee of completeness — that gives you a changelog with gaps.
The rule of thumb: Project Knowledge is for files Claude needs to search. Conversation uploads are for files Claude needs to read in full. The raw changelog files need to be read in full. The consolidated files that come out of this process — those go into Project Knowledge.
At the end of this step, you’ll have 2 new files:
The first is a Changelog Reference, organized by topic. When Claude needs to figure out how to build something, it checks this file to see what FlutterFlow actually supports today. Without it, Claude defaults to workarounds for limitations that were removed a year ago. This file answers: “What can I use, and since when?”
The second is a Breaking Changes & Migration Warnings file. FlutterFlow renames features, moves things in the editor, changes default behaviors, and deprecates old approaches sometimes without a formal announcement. When something that “should work” doesn’t, this is the file Claude checks. It answers: “What changed out from under me?”
Both files are generated from release notes, not from your actual editor. This process will reduce the error rate, but you should still expect some entries to be wrong. That's where the Breaking Changes file comes in, because it's designed to grow. Every time something doesn't match what you see in your editor, that's a new entry. The Project Instructions we'll add in the next step tell Claude to track those discoveries and list them at the end of each session, so you can update the file and re-upload it.
Creating the Changelog and Breaking Changes & Migration Warnings File
A Project within Claude is required. If you do not have a project setup, click the Projects folder at the left column, and select “Create New Project”
Open a new conversation inside your Claude project
Upload the Zip file to the conversation
Paste this entire prompt:
I’ve uploaded a zip file containing FlutterFlow “What’s New” release notes — one markdown file per release, covering January 1st, 2024 through [INSERT THE DATE YOU RAN THE SCRIPT HERE].
Please do the following:
Step 1: Unzip and inventory. Unzip the file. List every markdown file found, sorted by date (oldest first). Tell me how many files there are and the date range they cover.
Step 2: Read every file. Read the full contents of every file. Do not summarize or skim — you need all of it for the next steps.
Step 3: Create File 1 — Changelog Reference. Consolidate everything into a single reference file organized by TOPIC (not by date). The goal is: when I need to know “does FlutterFlow support X?” or “when did they add Y?”, I can scan one file and find the answer.
Structure:
Group related changes under topic headings (e.g., “Custom Code & Actions”, “Widget Updates”, “Firebase Integration”, “State Management”, “Navigation & Routing”, “UI Builder”, “Testing & Debugging”, “Deployment”, “AI Features”, “Performance”, etc.)
Under each topic, list changes chronologically with the release date
For each change, include:
What changed (1-2 sentences, stripped of marketing language)
The release date
The documentation link if one was included in the source file
Strip all pricing, promotional, and roadmap-teaser content — keep only what affects how you build
If a later release supersedes or enhances an earlier change, note that (e.g., “Enhanced in [date]: now also supports X”)
Name the file: FLUTTERFLOW_CHANGELOG_REFERENCE.md
Step 4: Create File 2 — Breaking Changes & Migration Warnings. Scan everything you read for changes that could silently break existing projects or confuse someone upgrading. This includes:
Features that were RENAMED (old name → new name)
Features that were REMOVED or DEPRECATED
Default behaviors that CHANGED (e.g., “X used to default to Y, now defaults to Z”)
Features that MOVED to a different location in the editor
New REQUIREMENTS (e.g., “feature X now requires enabling Y first”)
Known BUGS or REGRESSIONS mentioned in the release notes
Anything where the release note says “breaking change”, “migration”, “action required”, or similar
Workflow changes (e.g., “you used to do X this way, now you do it this way”)
Structure:
Organize by severity: “Breaking Changes” first, then “Deprecations”, then “Behavioral Changes”, then “UI Relocations”
For each entry, include:
What changed
When (release date)
What it replaces or breaks
What to do instead (if mentioned in the release notes)
Documentation link if available
Name the file: FLUTTERFLOW_BREAKING_CHANGES.md
Step 5: URL audit. Go back through every source file. Extract every URL. Compare against the two files you just created. List any URLs that didn’t make it into either file, along with which source file they came from and what they reference. If any are missing, add them to the appropriate file.
Important:
Do NOT skip any files. Every release note matters.
Do NOT invent information. If a release note is vague, quote it as-is and mark it “[VAGUE — verify in editor]”
Preserve all documentation URLs exactly as they appear in the source files
If two releases contradict each other (e.g., feature added then removed), note both with dates

Upload the ZIP file directly into the chat window (not into Project files) and paste the provided prompt below it. Open both files generated and review them for any obvious gaps or errors. Add corrections to the prompt if needed, regenerating the files.
Save both files (the second will be just a template for now) to your local folders.

Changelog and Breaking Changes & Migration Warnings File Completed
Step 13: Claude Setup - Project Instructions
Now that you have the files, you’ll still need to give Claude specific instructions so it understands when to query the files, and why are they present in project files.
Familiar with Claude? Upload both files from Step 12 to your project files. Copy the project instructions from Step 13, Item 4. If your project already has existing instructions, open a new conversation, paste both sets, and ask Claude to create a unified version. Continue from Step 14.
With your project open, click on the + sign for files
Upload both files created on Step 12
FLUTTERFLOW_CHANGELOG_REFERENCE.md
FLUTTERFLOW_BREAKING_CHANGES.md

In your Claude project, click the + button next to Files (1) to upload the .md files, and click the edit icon next to Instructions (3) to add your prompt 
Upload from device (2) to upload your .md files Click on the Pencil icon, next to INSTRUCTIONS
Copy/Paste the following instructions. If your project already has instructions populated, do not overwrite them. Open a new conversation, paste both your existing instructions and the ones below, and ask Claude to explain any conflicts and create a unified version.
<flutterflow_context>
Your training data for FlutterFlow is from approximately v4.x (early 2024). The current version is v6.x. Your training data for Flutter is from approximately 3.19. The current version is 3.38.5. These reference files compensate for that gap. When your training data conflicts with what these files say, the files win.
At the start of each session, ask me which version of FlutterFlow I’m currently using.
</flutterflow_context>
<flutterflow_reference_files>
Before giving any FlutterFlow build instructions, you MUST check BOTH of these files. Finding the answer in one does NOT skip the other — they serve different purposes.
FLUTTERFLOW_CHANGELOG_REFERENCE.md — Confirms whether a feature exists, when it was added, and whether there’s a newer or simpler way to accomplish the task. Read this file using the view tool, not project_knowledge_search.
FLUTTERFLOW_BREAKING_CHANGES.md — Catches renamed features, changed defaults, moved menus, and deprecated approaches that could silently break your instructions. Read this file using the view tool, not project_knowledge_search.
When a feature has multiple entries across different dates, the most recent entry represents the current behavior. Earlier entries are history — useful for understanding what changed, but the last entry is the one you build instructions from.
When a reference file entry includes a documentation URL, use web_fetch to check that URL for the most current information before giving instructions. The reference files tell you what existed at export time — the URL tells you what’s true now.
If a feature appears in the Changelog Reference but has no URL and you’re unsure how it works in the current editor, search docs.flutterflow.io before guessing. Use web_search with site:docs.flutterflow.io [topic] — do not try to fetch URLs directly unless the reference file provided one.
Never give FlutterFlow instructions from your training data alone. If you can’t find the answer in these files or on docs.flutterflow.io, say “I’m not sure — verify this in your editor” instead of guessing.
</flutterflow_reference_files>
<source_tags>
Every FlutterFlow build instruction you give MUST include a source tag so I can see where it came from. No exceptions.
✅ Changelog — found in the Changelog Reference
✅ Breaking Changes — found in the Breaking Changes file
⚠️ docs — found on docs.flutterflow.io (not yet verified in my editor)
❓ UNCERTAIN — not found in any reference; verify in your editor before proceeding
If an instruction has no tag, I will assume you guessed.
<example> Here is an example of a properly tagged build instruction:
“Add a Conditional Action to your button’s action chain. Select ‘Single Condition’ and set the condition to check whether your page state variable isSaving equals true. ✅ Changelog — Conditional Actions added in March 2024 release. ✅ Breaking Changes — no breaking changes noted for this feature.”
Here is an example of what NOT to do:
“Add a Conditional Action to your button’s action chain. Select ‘Single Condition’ and set the condition.”
The second example has no source tags. I cannot tell whether this came from the reference files or from training data. </example>
</source_tags>
<keeping_files_accurate>
These reference files were generated from release notes, not verified in the editor. Two things will happen as you build:
You’ll find entries that are wrong — a menu path that doesn’t match, a feature that works differently than described, or a breaking change that was later fixed.
You’ll discover new issues that aren’t in either file — silent changes, undocumented quirks, things that broke without appearing in any release note. These go in the Breaking Changes file.
When you tell me something didn’t work or doesn’t match what you see in your editor, I will note it for the end-of-session handoff so you can update the files and re-upload them to your project.
Over time, these corrections are what turn a generated reference into a reliable one.
</keeping_files_accurate>
<end_of_session_handoff>
At the end of every work session, before wrapping up, list any corrections or additions needed for FLUTTERFLOW_BREAKING_CHANGES.md. Format each as:
CORRECTION: [what the file currently says] → [what it should say]
NEW ENTRY: [severity level] — [what happened, when, what to do instead]
Do not skip this step. If no corrections were found during the session, say so explicitly — do not stay silent.
</end_of_session_handoff>
Click “Save Instructions”

Paste the full project instructions into the text field (4) and click Save instructions (5) 6. Now that the project instructions are complete, remember that at the end of each building session you need to ask Claude to create a “handoff.” The handoff will include instructions for menus / items that were discovered incorrect during the session (and will explain how to update the FLUTTERFLOW_BREAKING_CHANGES.md file
Claude Setup - Project Instructions Complete


Step 14: Claude Setup - Global Settings
For this project along with its files and instructions to operate correctly, you’ll need to do a global change under settings, allowing code execution. The project instructions tell Claude to read the reference files using the view tool, which reads files in order, top to bottom. Without Code Execution enabled, Claude can only search project files by keyword, returning fragments out of order and may miss entries entirely. For the view tool to work, Code Execution is required.
Familiar with Claude? Access Claude's global settings and ensure Code Execution and File Creation is turned on. If it is off, I advise you read the section further down in this step on expected behavior changes. Once it is on, this tutorial is complete. Optional closing section with additional considerations at the end of this step.
Enabling Code Execution
From Claude’s main screen, access the SETTINGS Menu
Click the icon (usually with the first letter of your name) on the lower left
from the popup, select SETTINGS
 highlights the profile icon showing the initial \"B\" in the bottom-left corner, and 1(b) marks the \"Settings\" option near the top of the menu. Other menu items include Language, Get help, Upgrade plan, Get apps and extensions, Gift Claude, Learn more, and Log out. The email address is partially redacted with a blue box for privacy.")
Click your profile icon (1a) in the bottom-left corner, then select Settings (1b) Select Capabilities (Left Menu)
Scroll side window down, until you see “Code Execution and File Creation”
Ensure this toggle is turned ON
 marks the enabled toggle next to \"Code execution and file creation,\" which is described as allowing Claude to execute code and create docs, spreadsheets, presentations, PDFs, and data reports. The section is outlined in red with an arrow pointing to the blue toggle in the on position. Other visible settings include Artifacts, AI-powered artifacts, Inline visualizations, and Allow network egress. A Skills section at the bottom notes that skills have moved to the Customize page")
In Settings, click Capabilities (2) and ensure Code execution and file creation is toggled on (3a) Behavior changes with Code Execution
Besides the feature availability above, if you had code execution turned off, you may have experienced a moment where Claude would abruptly end the conversation. With Code Execution on, this will change. Claude will begin compacting your conversation, giving the impression of a never ending session. Extremely long conversations are not a best practice. As you continue your development with Claude, you’ll be able to identify good moments to do a handoff to a new session (such as the end of a logical step or screen development). I have a brief post on this if you’d like to read further:
 highlights the profile icon showing the initial \"B\" in the bottom-left corner, and 1(b) marks the \"Settings\" option near the top of the menu. Other menu items include Language, Get help, Upgrade plan, Get apps and extensions, Gift Claude, Learn more, and Log out. The email address is partially redacted with a blue box for privacy.")
 marks the enabled toggle next to \"Code execution and file creation,\" which is described as allowing Claude to execute code and create docs, spreadsheets, presentations, PDFs, and data reports. The section is outlined in red with an arrow pointing to the blue toggle in the on position. Other visible settings include Artifacts, AI-powered artifacts, Inline visualizations, and Allow network egress. A Skills section at the bottom notes that skills have moved to the Customize page")
Claude Setup -Global Settings Complete
Congratulations on reaching the end of this tutorial. You now have a Claude project live, where you can ask for assistance in deployment for your app in FlutterFlow, with increased confidence in the instructions, which will hopefully reduce your frustration through this process.
FlutterFlow keeps shipping updates, which means the reference files will go stale over time. Plan on re-running the export every few months and regenerating the two files to keep them current. When that happens, you can do a new conversation, with the current changelog file plus the new topics, and ask Claude to merge them (and then uploading a new version of the file).
Tutorial Complete
Closing and Summary
This tutorial covered one specific way to improve FlutterFlow instructions in Claude. However, unless your only intention is for a quick demo not meant for production, I’d encourage you to take a brief pause before you start building. Consider having a conversation with Claude and ask: what are the decisions I should make now that will be expensive to change later? Data model structure, security rules, naming conventions, how your app navigates, how it handles errors. Claude knows what these are. It just won’t bring them up unless you ask, because it’s action-biased — when you say “build this screen,” it builds the screen. I learned that the hard way when I spent a full week going back to fix four pages for accessibility, things that would have taken minutes per screen if I had set them up from the start.
Good luck with the build. If you're going through this process and something isn't working, or you found a better way to do any of these steps, drop it in the comments. And if you're on a different no-code platform and managed to adapt this for your setup, I'd genuinely want to hear how it went.
Using a Different Platform or LLM?
The logic for this process would apply to other platforms as well. You need to have a date range for platform knowledge gap, and a changelog guide. You could paste this article in Claude for example along with the scripts and ask for adjustments for the platform of your choice.
This also applies if you’re using ChatGPT, Gemini, or another LLM instead of Claude. Follow this tutorial through Step 12 to generate the reference files, then bring those files to your LLM and ask it to write project instructions adapted to how that platform works.
Appendix: Why the Changelog Works
This is Claude's full explanation on why the changelog approach works. I asked Claude to explain why simply warning it that its FlutterFlow knowledge was outdated didn't change the quality of its instructions. This was Claude's response under Opus 4.7 on April 18, 2026:
The abstract warning fails because it lives in the framing, not in the knowledge. When the AI reads “your FlutterFlow knowledge is outdated,” it adjusts tone — hedging language, more caveats — but every specific instruction it produces still has to come from training data, because that’s the only source it has to produce from. The warning tells the AI that something is wrong without giving it any mechanism to identify which things are wrong, so individual claims keep shipping with training-era confidence even as the preamble apologizes. This is the unknown-unknowns problem: the AI doesn’t know what it doesn’t know, and a generic “you’re stale” doesn’t convert that ignorance into anything actionable at the moment a specific claim is generated. In the current message the warning is fresh but still has no target; in persistent project instructions it’s both untargeted and dulled by repetition — the AI parses it as background scenery on every turn and moves past it. Neither location can fire the warning at the point of risk, which is the moment one specific outdated fact is about to be produced.
Why the changelog works
A changelog converts unknown-unknowns into known-unknowns. Instead of “something is stale,” it provides concrete claims — “Custom Code Expressions shipped in v5.8,” “Parallel Actions in v5.4,” “the Rebuild Action replaced the old workaround in v6.1” — that the AI can check against before producing an instruction. The generic warning becomes a lookup table: when the AI is about to recommend a nested Conditional Action as a workaround, the changelog entry for Custom Code Expressions flags that the workaround is obsolete. The warning finally has a target, and the AI finally has a mechanism to catch itself — not because it’s gotten more careful, but because “something is wrong” has been replaced with “here is the specific inventory of things that changed after your training.” That’s the difference between telling someone their map is old and handing them a list of every road that’s been built since the map was printed.